

Why the GreenGirt CMH Delta Adjustable System is a Game-Changer
Welcome to our comprehensive guide on installing the GreenGirt CMH Delta™ Adjustable continuous insulation system. This revolutionary system is an innovative solution that offers an adjustable plane for cladding attachment, catering to out-of-plumb walls or plane deviations, varying insulation thicknesses, and enhancing the overall thermal performance of your building’s exterior.
The Benefits of the GreenGirt CMH Delta Adjustable System
The GreenGirt CMH Delta Adjustable system is not merely a product; it’s a game-changer in the field of insulation systems. It is designed to optimize energy efficiency, provide superior thermal performance, and ensure a seamless installation process. Its unique adjustable feature allows for precision and ease during installation on out-of-plumb and varying substrates without compromising the integrity of the thermal envelope.
Importance in Today’s Construction Industry
This system holds immense importance in today’s construction industry. With escalating energy costs and increasing awareness about environmental sustainability, the demand for efficient insulation systems has never been greater. The GreenGirt CMH Delta Adjustable system meets this demand by providing a solution for retrofitting existing buildings or new construction projects that is energy-efficient and contributes to correcting plane deviations.
Durability and Ease of Installation
The benefits of the GreenGirt CMH Delta Adjustable system extend beyond its energy efficiency. It is engineered with the highest standards to deliver durability, excellent thermal insulation, and adjustability for your building envelope. Moreover, its ease of installation reduces labor time and costs, making it a preferred choice among professionals.
Step-by-Step Guide to Installing GreenGirt CMH Delta Adjustable
In this article, we aim to provide a detailed, step-by-step guide on properly installing this system. Whether you are a seasoned professional or a beginner in the field of insulation systems, this guide will serve as an invaluable resource. We’ll walk you through each stage of the installation process – from understanding the components of the system, pre-installation requirements, the actual installation process, and post-installation checks.
Maximizing the Benefits of the GreenGirt CMH Delta Adjustable System
By following this guide, you will ensure the successful installation of the GreenGirt CMH Delta Adjustable continuous insulation system and maximize its benefits for your construction project. Let’s get started!

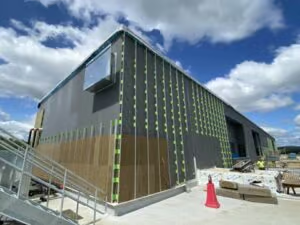
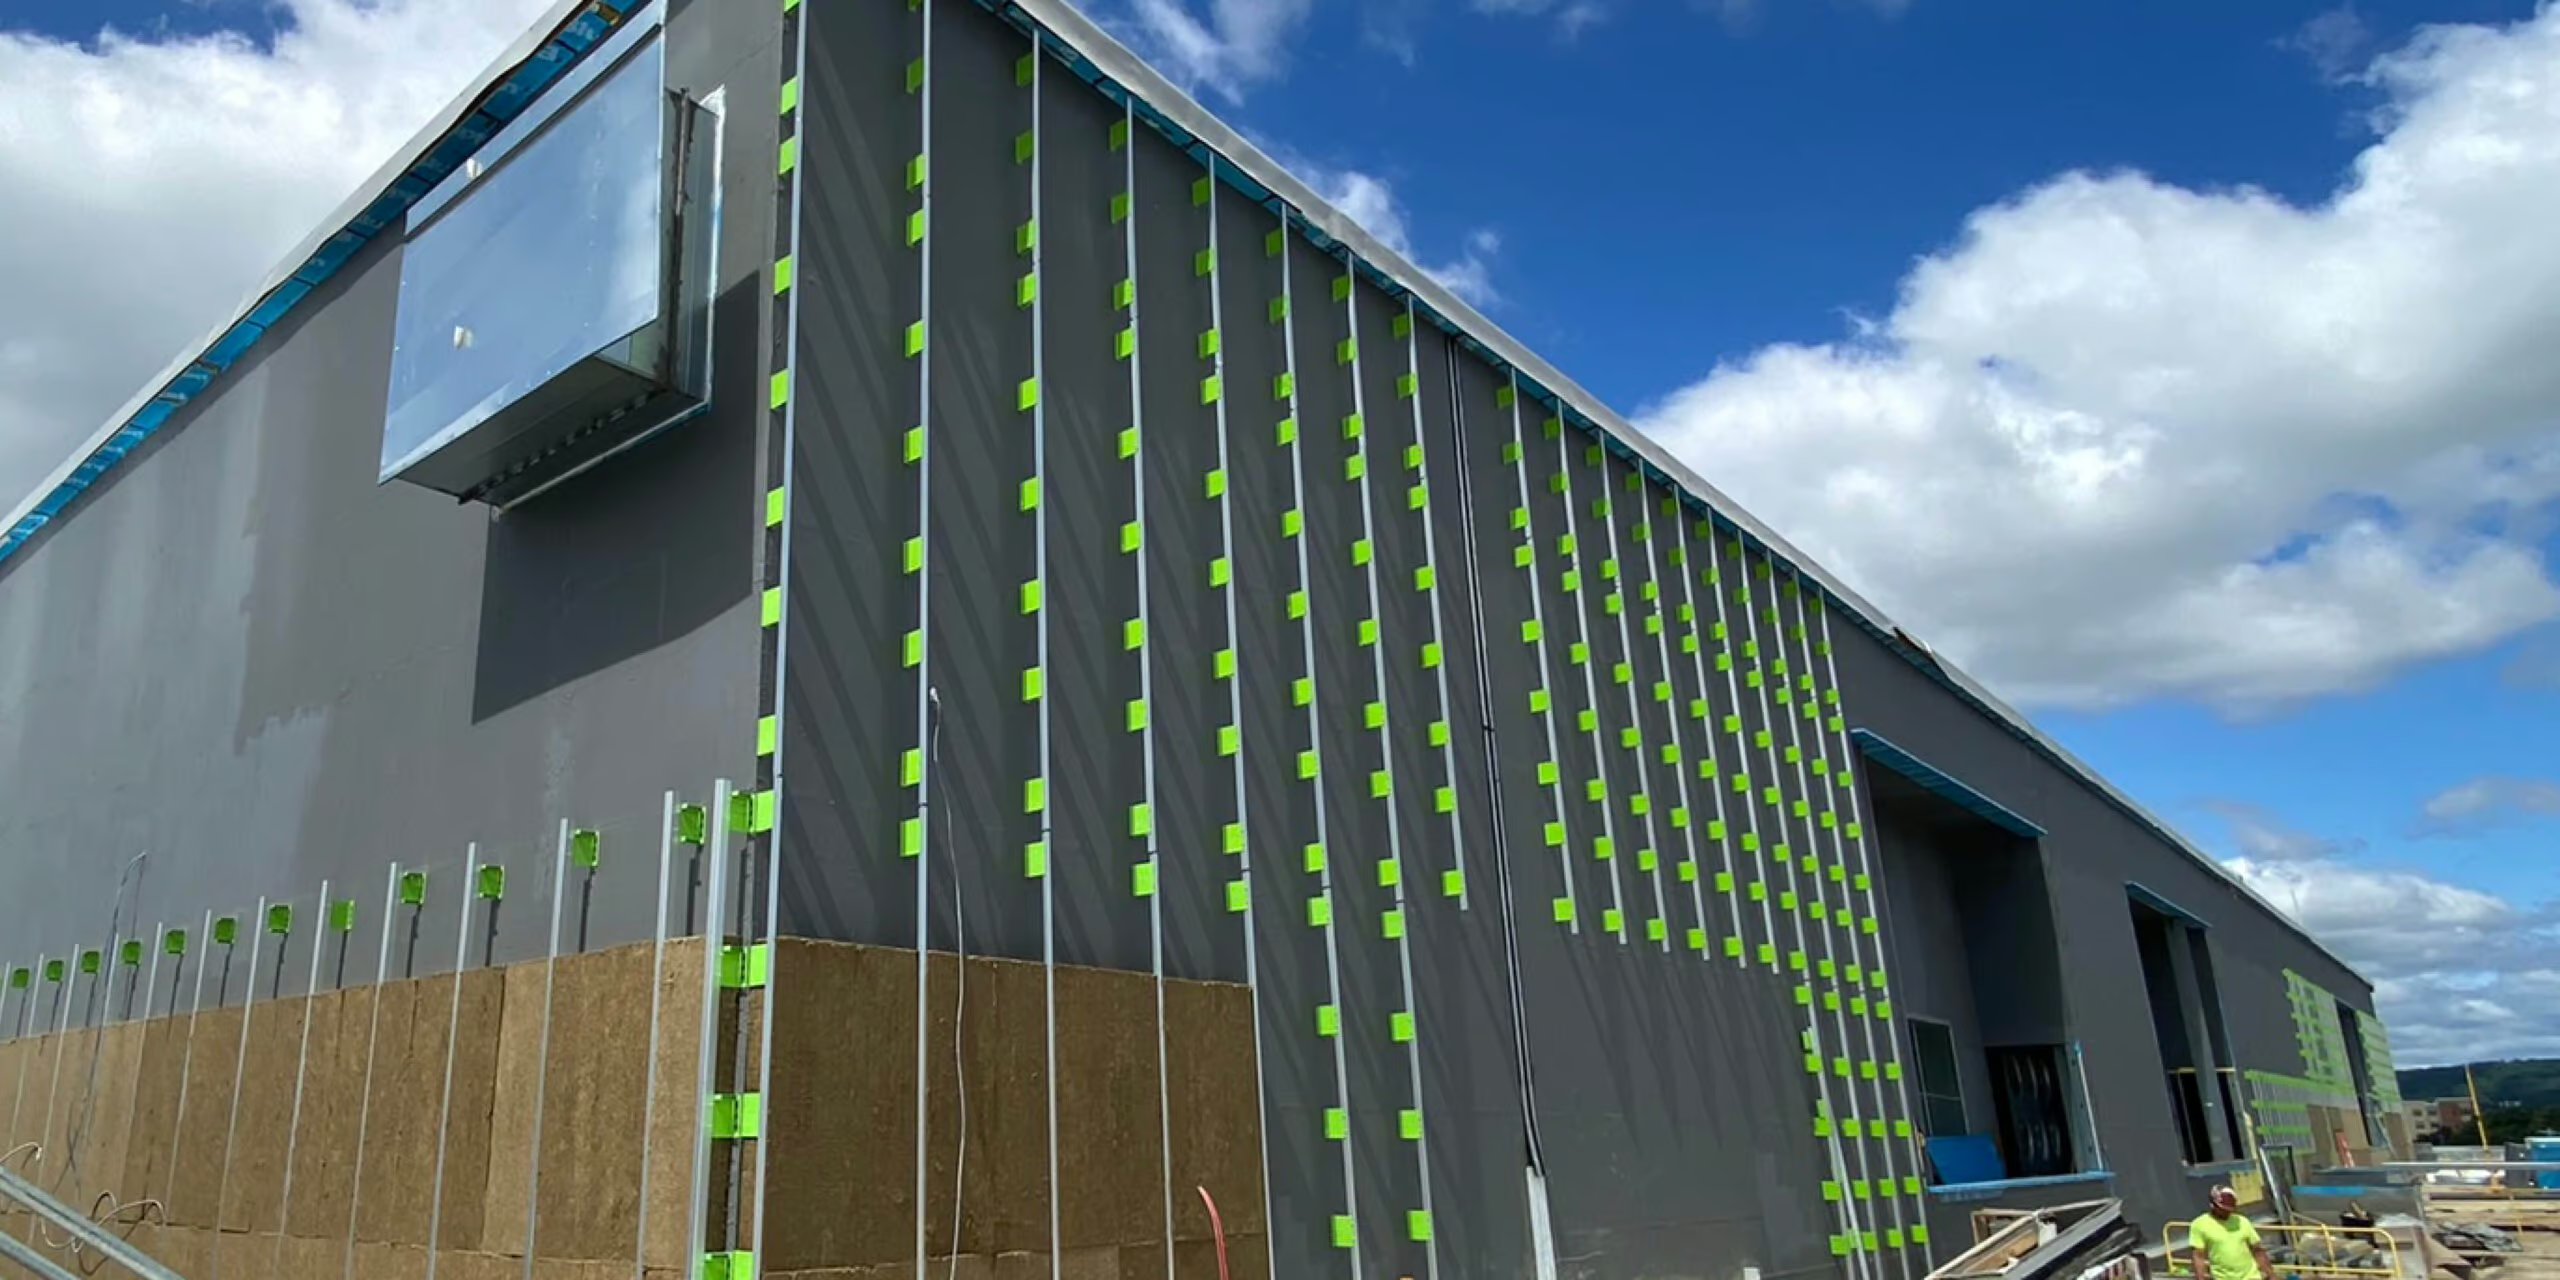
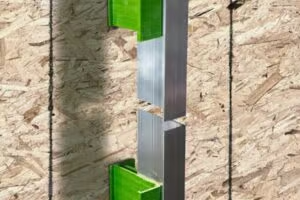
Installation of the GreenGirt CMH Delta Adjustable continuous insulation system.
Understanding the System
Before we dive into the installation process, it’s crucial to understand the components of the GreenGirt CMH Delta Adjustable continuous insulation system and their respective functions. This system comprises several vital parts that work together to provide an effective adjustable continuous insulation solution.
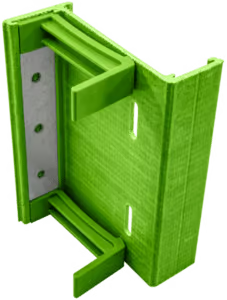
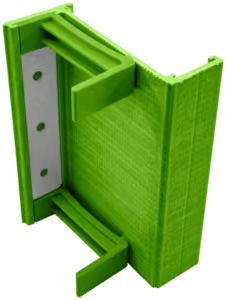
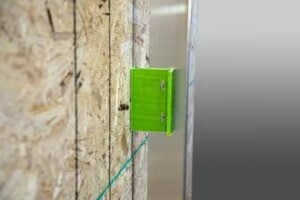
Base Brackets:
GreenGirt CMH Delta Adjustable base brackets, consisting of a composite metal hybrid material, come in two profiles – Z-profile with a front flange and L-profile without a front flange. They also come in two types: expansion base brackets and fixed base brackets. Both are utilized within a complete wall system to allow for expansion. These base brackets form the system’s foundation and are designed to be installed vertically according to shop drawings. The base brackets offer adjustability for up to 10.5″ away from the substrate, catering to varying insulation systems and plane deviations.

Expansion Base Bracket

Fixed Base Bracket
All base brackets come equipped with a pre-punched metal insert in the flange installed against the substrate, enhancing structural integrity and ensuring a firm and secure installation without sacrificing thermal performance.
A unique feature of these base brackets is the Dual Grip™ technology. This state-of-the-art technology is designed to securely hold the clip or L-rail in place while adjusting to the required plane before side-stitching. The result is a firm and robust connection that facilitates the smooth installation of the system and enhances its overall stability and durability. In addition, the Dual Grip technology assists in an efficient story pole installation technique, saving labor and time.
Mineral Wool Insulation:
Insulation is the core material that provides thermal resistance and enhances the energy efficiency of the building. Base brackets, rails, or hat channels hold it in place on the wall, forming a continuous layer of insulation across the building’s exterior.

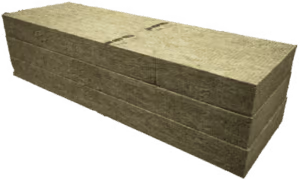
Stacks of mineral wool insulation.
L-Rails:
L-rails, available in steel, aluminum, or composite metal hybrid materials, attach to the base brackets using side-stitch fasteners. Standard L-rails come in 8′ lengths but can be customized as needed. L-rails allow for a quick and easy installation process of base brackets with the story pole technique. L-rails also serve as the secure mounting platform for the cladding application. They should not cross movement joints and must leave a ½” gap at all joints.


CMH L-Rail

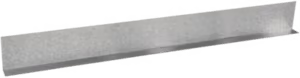
Steel L-Rail

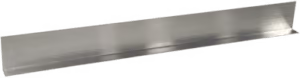
Aluminum L-Rail
Clips:
Clips are 6″ long and have a similar L-profile to an L-rail. They are typically used in place of L-rails for horizontal applications. They are also available in steel, aluminum, or CMH.
Hex Head Screws:
These screws are used to secure base brackets to the substrate, providing a stable structure when assembled.


Washered Side-Stitch Fasteners:
These fasteners attach the L-rails to the base brackets. They must be centered in slots on expansion base brackets to allow for expansion.
Each component has a unique role in the system and contributes to providing an adjustable continuous insulation solution. Understanding the functionality of each element is essential to installing the GreenGirt CMH Delta system and maximizing its benefits effectively.
Pre-installation Requirements
Before starting the GreenGirt CMH Delta Adjustable continuous insulation system installation, preparing adequately is essential. This involves gathering the necessary tools and understanding the safety precautions to ensure a smooth and safe installation.
Tools Required for Installation:
Before installing the GreenGirt CMH Delta Adjustable continuous insulation system, it’s important to ensure that you have all the necessary tools. These tools are crucial for a seamless and efficient installation process. While we won’t list them individually here, you can find a detailed list of required tools in the installation guide provided with your GreenGirt CMH Delta Adjustable system package and on our website. Also, reference the installation guide for a list of tools that should not be utilized to install the GreenGirt CMH Delta Adjustable system. We strongly recommend thoroughly reviewing the installation guide to familiarize yourself with the required tools and their specific uses during the installation.
Safety Precautions and Measures:
Safety is paramount during installation. It is critical to use appropriate personal protective equipment (PPE), including safety glasses, gloves, head protection, and sturdy footwear to protect yourself from potential hazards. Handle all materials and tools carefully and maintain a clean, organized work area to prevent accidents. If working at heights, ensure ladders are stable and secured before beginning your work.
Remember, a successful installation depends on how well you understand the system, the process, and the careful adherence to safety measures. Always refer to the installation guide for detailed instructions and safety guidelines throughout the installation process.
Step-by-Step Installation Process
Installing the GreenGirt CMH Delta Adjustable continuous insulation system requires careful attention to detail and adherence to instructions. Here’s a step-by-step guide to help you through the process.
Preparation of the Installation Site:
Start by preparing your installation site. Ensure the area is clean, clear of debris, and ready for installation. This includes checking the substrate for any irregularities that might affect the installation.
Installation of Base Brackets:
Begin the installation with the base brackets. These should be installed vertically per shop drawings and project-specific requirements, using the pre-punched metal insert in the flange closest to the substrate for structural integrity. The shop drawings and sample layout show the placement and order of expansion brackets vs. fixed brackets. Base brackets can be installed using a story pole installation method for a quick and easy way to consistently and evenly place the base brackets against the substrate. Remember to use the Dual Grip technology to hold the clip or L-rail securely.
Placement and Attachment of L-Rails or Clips:
Place the L-rails or clips into the base brackets. Shim and level the L-rail or clips out to the required plane. This adjustment must accommodate varying insulation thicknesses, cladding systems, and building requirements. Remember never to leave an L-rail or clip non-mechanically attached to a base bracket.
Use of Side-Stitch Fasteners:
Use two side-stitch fasteners per every base bracket to secure the L-rails in place, ensuring a firm and robust connection. Side-stitch fasteners should always go from the fiber-reinforced polymer (FRP) material and bite into the metal L-rail or clip. The purpose of this is to maximize fastener retention. Install side-stitch fasteners in the center of the pre-punched slots on the expansion base brackets to allow for expansion.

Ensuring Thermal Expansion Accommodation:
Finally, ensure the system can accommodate thermal expansion. Leave a ½” gap (or as specified in the drawings) between L-rail joints. Use three fixed brackets per 10′ steel rail, with the rest as expansion brackets. For aluminum rails, use two fixed brackets per 10′ rail, with the remainder as expansion brackets. Steel rails less than 6′ long and aluminum rails less than 4′ long do not need expansion brackets.

Installation of Insulation:
Remember, the success of your GreenGirt CMH Delta Adjustable continuous insulation system installation lies in following these steps accurately and carefully. Always refer to the installation guide for detailed instructions and additional pro tips through the installation process.
Post Installation Checks
- Checking for Proper Alignment: Check the alignment of the base brackets and L-rails. The base brackets should be vertically aligned per the shop drawings and sample layout, and the L-rails should be adjusted to the required plane. It is crucial to ensure everything is aligned correctly.
- Verification of Secure Attachments: Next, verify that all attachments are secure. This includes the attachment of the base brackets, L-rails, and insulation. Check to ensure that all fasteners are secured and that there is no movement or looseness in the attached components.
Performing these post-installation checks is a critical part of the installation process. These checks ensure your GreenGirt CMH Delta Adjustable continuous insulation system is properly installed, functions efficiently, and is ready to deliver long-term thermal efficiency for your building. Always refer to the installation guide if you encounter any issues during these checks.
Conclusion
In conclusion, the installation process for the GreenGirt CMH Delta Adjustable system is a systematic and detailed procedure that requires preparation, precise execution, and post-installation checks.
Starting with the preparation of the installation site, the process proceeds through the installation of base brackets, placement and attachment of L-rails or clips, adjusting rails to the required plane, using side-stitch fasteners, and ensuring accommodation for thermal expansion. After the installation, technicians perform post-installation checks to verify proper alignment and secure attachments.
Properly installing the GreenGirt CMH Delta Adjustable system is essential in reaping its full benefits. A correctly installed system ensures optimal thermal efficiency, contributing to energy savings and a more sustainable building structure. Additionally, it provides a robust and secure cladding attachment point, enhancing the structural integrity of your building.
Therefore, it’s crucial to follow the outlined steps carefully and refer to the installation guide throughout the process. By doing so, you can ensure a successful and efficient installation and long-term performance of the GreenGirt CMH Delta Adjustable continuous insulation system.
Get Installation Support for GreenGirt CMH Delta Adjustable
Get step-by-step instructions to keep installation of the GreenGirt CMH Delta system efficient and easy, resolving wall irregularities with ease.
Download the GreenGirt CMH Delta Adjustable Installation Guide
Have installation questions about the GreenGirt CMH Delta system? Our expert engineers are ready to confirm the right installation approach.
Related Resources:
GreenGirt CMH Delta Adjustable System Overview & Resources
View “Best Practice: Ease of Installation”
–
–
Frequently Asked Questions
What is the adjustability range for GreenGirt CMH Delta?
GreenGirt CMH Delta Adjustable systems are designed provide adjustability for up to 10.5” away from the substrate, to handle plane deviations and varying insulation thicknesses.
What gap/spacing do you leave at GreenGirt CMH Delta L-rail joints for thermal expansion?
Do not cross movement joints and leave a ½” gap at all L-rail joints (or as specified in the drawings).
Which direction do GreenGirt CMH Delta side-stitch fasteners go?
Install two side-stitch fasteners per base bracket, and drive them from the FRP into the metal L-rail/clip to maximize retention; on expansion brackets, place them centered in the pre-punched slots to allow movement.